Upgrading a Solidoodle 2 Pro – Power Supply

My 2012 Solidoodle 2 Pro 3D printer’s original extruder got irreparably clogged, so I needed to replace the hotend. I decided to go with an E3D v6 1.75mm hotend (USA). This necessitated upgrading/replacing the power supply as well.

Tools

  • wire stripper (capable of stripping 16 AWG insulated wiring)
  • wire cutter (frequently part of a multipurpose wire stripper)
  • normal Phillips-head screwdriver
  • small flat-head screwdriver
  • multimeter (capable of measuring voltage in the range of 12V)

Parts

  • 12V 30A 360W DC power supply (12-volt, 30-amp, 360-watt, direct current); as suggested, I picked this one
  • 3 feet (1 meter) of 2-conductor or 3-conductor 16 AWG insulated power cable
  • normal-length pronged (wall plug) power cable, like the one currently connecting your 3D printer to wall power (16 AWG or 18 AWG)
  • some extra electrical/electricians tape

Cut off the end of the power cable farthest from the outlet plug.
The three wires inside are white (neutral), black (line/load), and green (ground).
Strip back the outer insulation a couple inches.
Strip each of them about 1 inch.

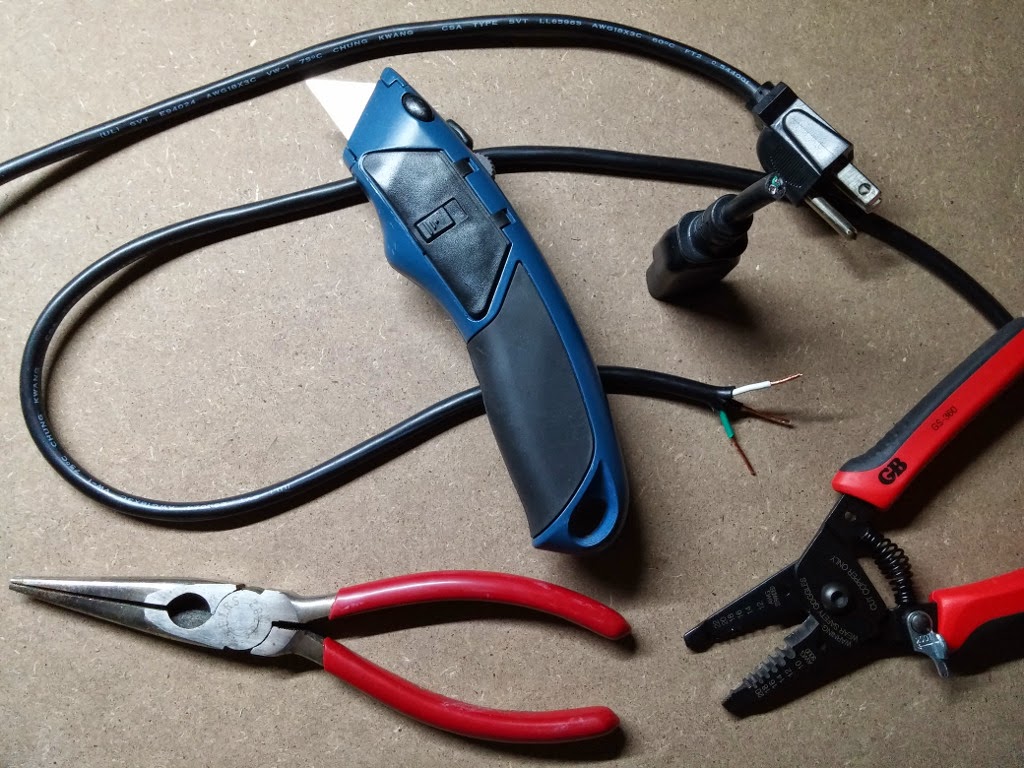
Locate the power supply’s input terminals, labelled ground (⏚ upside-down Christmas tree icon), neutral (N), and , line/load (L).

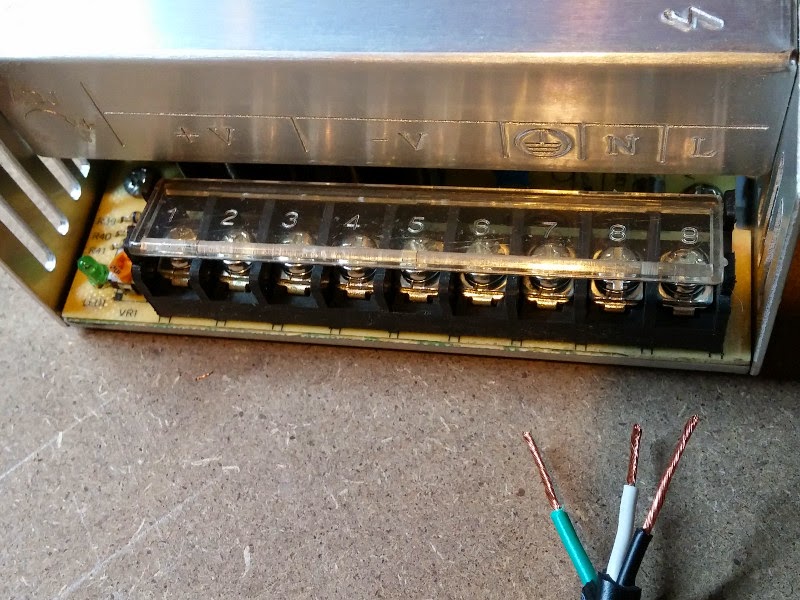
Attach the wires correctly: green to ground, white to neutral, and black to line/load. Simply loosen/unscrew the screws on the power supply (you don’t have to unscrew them entirely or take them off), carefully put the uncovered wire in, and re-tighten the screws (hand-tightened is enough; don’t overdo it).

Make sure the power supply is set to the correct voltage. Normal household electrical voltage in the United States is 110V-120V.

Locate the small, green, two-connector power terminal on the Solidoodle 2 Pro control board. It is at the end of the power supply cable currently connected to it.
Check the positions of the power cable wires *WRITE DOWN WHICH WENT WHERE* (i.e. black on top or bottom)!

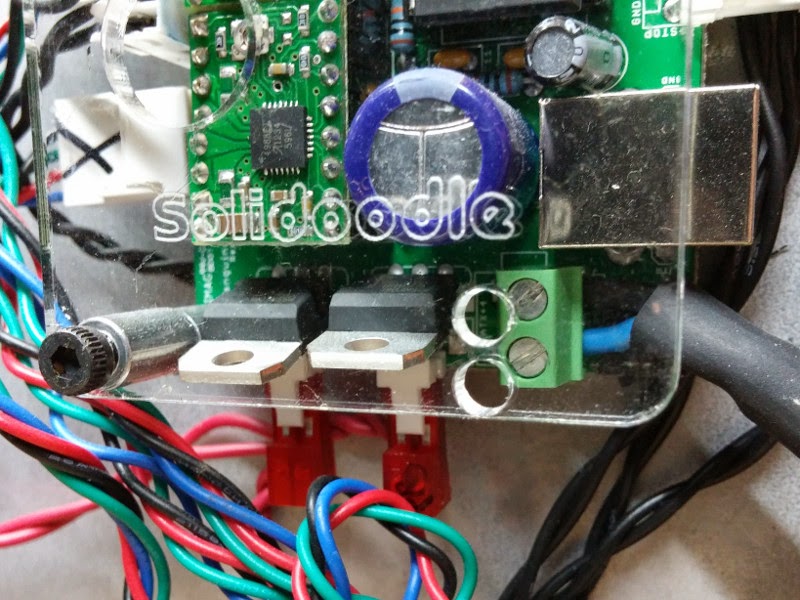
Carefully loosen each screw on the terminal enough to take the power cable wires out but not enough for the screws to come out or the terminal to come off the board. It is just a weak little plastic terminal, so avoid abusing it; it can break.
Take the power cables wires out of the terminal, pulling gently.
Un-tape the old/original power supply and its cable from the printer (you don’t have to take the tape all the way off) and set the printer aside.
Get out the multimeter and measure the voltage between the power cable wires while the old power supply is plugged into wall power. If you do not know how to do this, then read the manual that came with your multimeter (if you still have the manual) and watch “THE BEST Multimeter tutorial (HD)” by Afrotechmods, on YouTube.

Unplug the old power supply from wall power and plug in the new power supply to wall power. Immediately unplug it if you hear, smell, or see anything out of place (e.g. pops, burning, smoke) to indicate that you did not wire up the power supply correctly.
Use the multimeter to measure the voltage between the output terminals and make sure it is 12V. If you accidentally got a 5V or 24V power supply and try to use it here, then you’re gonna have a bad time.

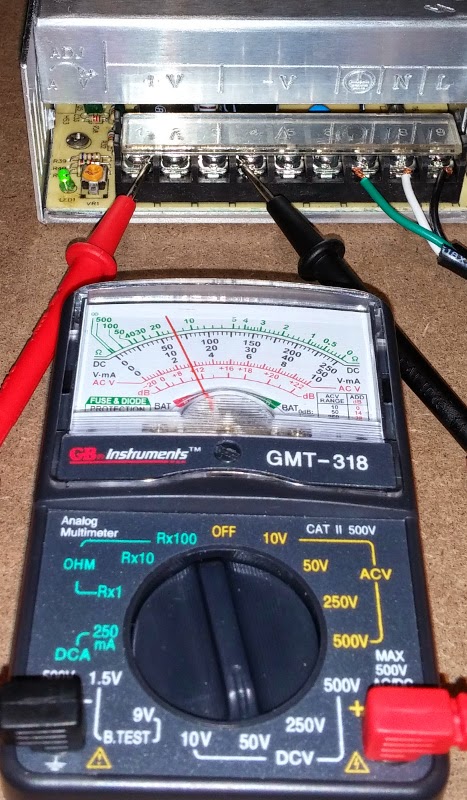
Prepare your new power supply-to-printer 16 AWG power cable by stripping a few inches of insulation off the ends and getting the individual wires sufficiently separate to connect to the correct terminals. The wires to go to the printer need to be carefully cut to the same length, otherwise connecting them will be difficult.

Unplug the new power supply from wall power if you haven’t already. Wait for it to be completely off.
Connect the supply-to-printer power cable to the new power supply output terminals.
Take note of exactly which wire (by color or texture) you connected to which terminal (positive or negative).

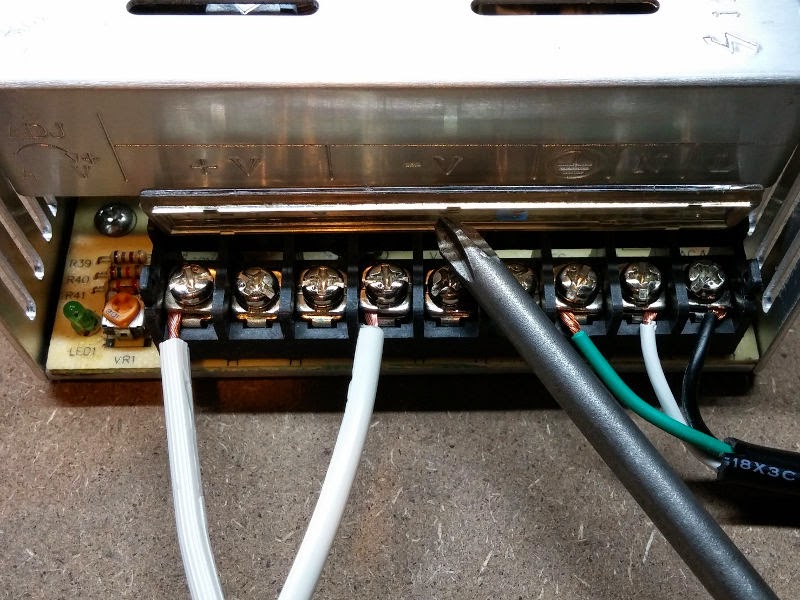
[OPTIONAL] You can plug the new power supply into wall power and use the multimeter to check which wire is positive and which is negative if you have to.

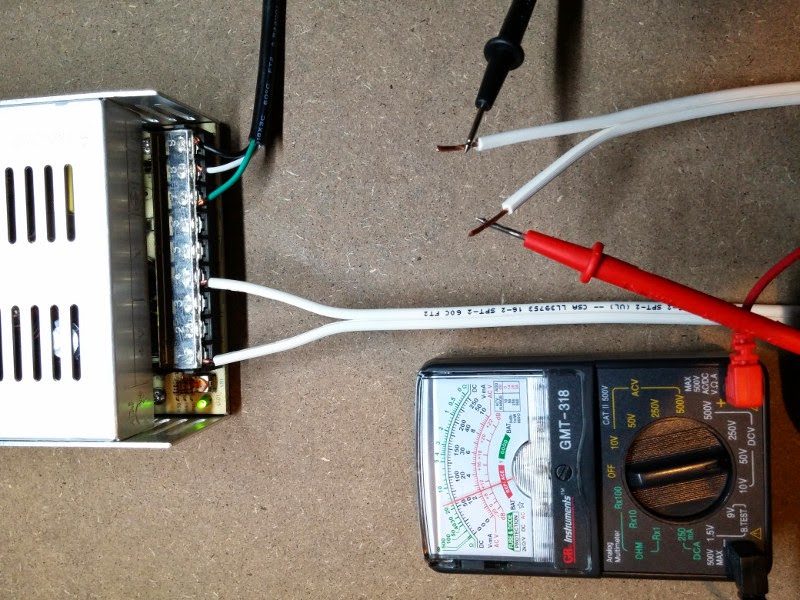
Being extra careful, connect your new power supply wires to the positions of the old ones (i.e. new positive wire to old positive terminal position) by putting the new wire in the terminal and holding it there while you gently tighten the screw to hold it in place. Over-tightening the screws can break/split the small, green, plastic terminal. If you are using stranded (as opposed to solid) wires, then you will need to twist them together a bit to keep them sufficiently together to get all the strands into a terminal.
Plug the new power supply into wall power. Immediately unplug it if you hear, smell, or see anything out of place (e.g. pops, burning, smoke) to indicate that you did not wire up the power supply correctly.
If your wiring is correct and the printer powers on as expected (e.g. the lights and fans turn on), then you can unplug it again and tape the power supply-to-printer power cable to the printer.
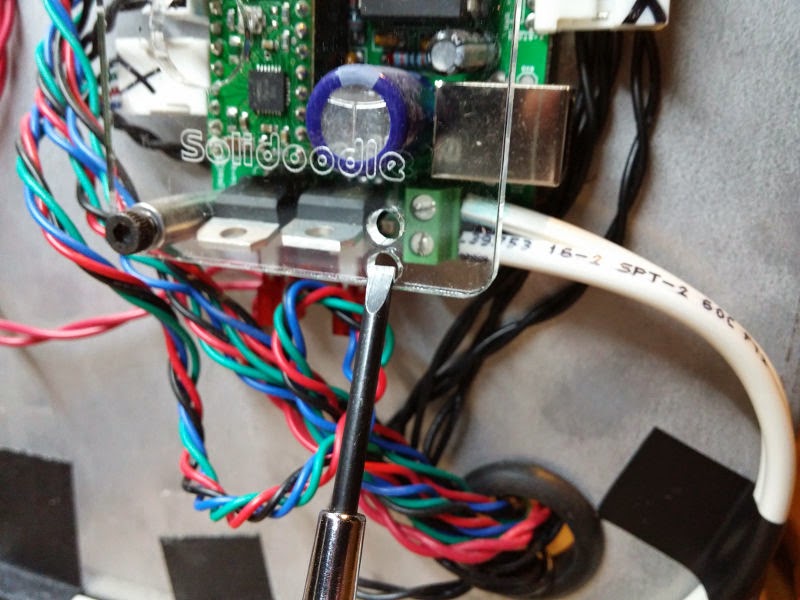
Sources

Additional Material

Next

Upgrading a Solidoodle 2 Pro – Disassembling the Extruder

Self-Served Certificate Authority

Creating and running your own certificate authority (CA) is how you can issue your own SSL certificates. This is not for everyone but can save a lot of hassle and money in the right circumstances. Herein I’ve documented the steps I successfully took to get set up with a CA on Ubuntu Linux using OpenSSL.

[UPDATED Friday, April 9, 2015 (2015/04/09)]

Tutorial


Much of this requires superuser permissions. I find it easier to just temporarily sign in as root rather than prefacing everything with “sudo”, but don’t forget to “exit” afterwards.

sudo su

First set up a place to keep your public key infrastructure (PKI).

mkdir /etc/keys
mkdir /etc/keys/ca
mkdir /etc/keys/ca/conf
mkdir /etc/keys/ca/certs
cd /etc/keys/ca

All PKI begins with a private key. Create a new private key for yourself as a certificate authority (CA).

openssl genrsa -out ca_root.key 8192

= Use the openssl software to generate a new, private, RSA cryptographic key, 8192 bits in length, saved as “ca_root.key”.

The private key can optionally be encrypted and secured with a passphrase by adding an (singular / just one) encryption option to the private key creation command [genrsa].

-aes128|-aes192|-aes256|-camellia128|-camellia192|-camellia256|-des|-des3|-idea

If you do not know which you want to use, then I recommend AES256. [1]

You then need to create a certificate signing request (CSR). A CSR provides identifying information (e.g. your name) and is signed by a private key.

openssl req -verbose -new -sha256 -extensions v3_ca -days 3650 -key ca_root.key -out ca_root.csr -utf8

= Use the openssl software to generate a CSR using the SHA256 algorithm and version 3 extensions for a CA, good for 10 years after creation (365 days per year * 10 years), signed with the private key “ca_root.key”, and saved as “ca_root.csr” in UTF-8.

  • If the PK is getting encrypted by default and you do not want that, then use the option “-nodes” (as in [no DES]).

This CSR then needs to be self-signed with the private key to be a root CA X.509 certificate. By self-signing, the CA is certifying that it is itself. The signed certificate is the public key portion of PKI. Self-sign the CSR.

openssl x509 -req -in ca_root.csr -signkey ca_root.key -days 3650 -out ca_root.pem

= Use the openssl software to generate an X.509 certificate from the CSR “ca_root.csr”, self-signed by the private key “ca_root.key”, good for 10 years after creation (365 days per year * 10 years), and saved as “ca_root.pem”.

You can check out / read / look at your key, request, and certificate, if you are interested:

cat ca_root.key
openssl rsa -in ca_root.key -noout -text
cat ca_root.csr
openssl req -in ca_root.csr -noout -text
cat ca_root.pem
openssl x509 -in ca_root.pem -noout -text

= Simply calling cat (“concatenate”) will show you the encrypted contents. Calling openssl with rsa or x509, respectively, will decrypt the key and certificate showing you their human-readable contents.

  • To the best of my searching, the CA root certificate serial number is irrelevant.

Copy the public certificate and change the extension from .pem to .crt for use/installation on Microsoft Windows.

cp ca_root.pem ca_root.crt

[2]

The root CA certificate needs to be added to the certificate management store wherever it needs to be trusted. e.g. Internet Explorer (Chrome uses the same store) and Firefox.
– Internet Explorer > Menu or Tools > Internet Options > Content tab > Certificates > Trusted Root Certification Authorities tab > Import

  • The default “Certificate intended purposes” should be sufficient, but if they might not be then you can change them by selecting the certificate and clicking the “Advanced” button.

– Firefox > Menu or Tools > Options > Advanced section > Certificates tab > View Certificates > Authorities tab > Import > choose what the certificate is supposed to identify (e.g your website, your email address).
[3] , [4] , [5]

Using the CA to sign CSRs will require a flat-file text database, a serial number file, and a configuration file. Store these in the configuration directory.

touch conf/index.txt
echo "01" > conf/ca_root.srl
nano conf/openssl.ca.conf

openssl.ca.conf

[ ca ]
default_ca = CA_default # The default ca section

[ CA_default ]
dir = /etc/keys/ca # top dir
database = $dir/conf/index.txt # index file.
new_certs_dir = $dir/certs # new certs dir

certificate = $dir/ca_root.pem # The CA cert
serial = $dir/conf/ca_root.srl # serial no file
private_key = $dir/ca_root.key # CA private key

default_days = 730 # how long to certify for
default_crl_days= 30 # how long before next CRL
default_md = sha256 # md to use

policy = policy_any # default policy
email_in_dn = no # Don't add the email into cert distinguished name (DN)

name_opt = ca_default # Subject name display option
cert_opt = ca_default # Certificate display option
copy_extensions = copy # Don't copy extensions from request

[ policy_any ]
countryName = supplied
stateOrProvinceName = optional
organizationName = optional
organizationalUnitName = optional
commonName = supplied
emailAddress = optional
  • The serial number in ca_root.srl will be automatically incremented by OpenSSL each time the CA is used to sign new certificates.

Each end entity certificate you wish to create and sign (e.g. for your website, email) will need its own private key. Create a new private key.

openssl genrsa -out certs/entity.key 4096
  • The bit length used here (4096) is smaller than that used for the original CA root key, but it doesn’t have to be.

Create a CSR for the end entity using the new private key.

openssl req -verbose -new -sha256 -days 1825 -key certs/entity.key -out certs/entity.csr -utf8
  • We are no longer using “-extensions v3_ca” because we aren’t signing a CA root certificate.
  • A wildcard certificate can be created by putting *.domain.tld as the common name (using your domain and tld; also potentially a subdomain as wildcards can only cover a single level of subdomain matching; a wildcard name will *NOT* match the naked domain [*.domain.tld will not work with domain.tld]).
  • Additional names can be included/supported using an openssl configuration file and the subjectAltName extension.

Sign the CSR using the CA.

openssl ca -verbose -config conf/openssl.ca.conf -in certs/entity.csr -out certs/entity.crt -days 1825 -utf8

= Use the openssl software to sign the CSR “entity.csr” with the CA and options specified in the configuration file “openssl.ca.conf”, saving the resulting certificate as “entity.crt”.

  • The CA cannot sign a certificate with the same common name as an active (un-revoked) certificate.

Creating a wildcard certificate with the naked domain name included as a SubjectAltName requires the use of a configuration file.

nano certs/entity.conf

entity.conf

[ req ]
default_bits = 4096
default_keyfile = entity.key
encrypt_key = no
default_md = sha256
prompt = no
utf8 = yes
distinguished_name = my_req_distinguished_name
req_extensions = my_extensions

[ my_req_distinguished_name ]
C = US
ST = Michigan
L = .
O = LogSine
CN = *.logsine.com

[ my_extensions ]
basicConstraints = CA:false
subjectAltName = @my_subject_alt_names
subjectKeyIdentifier = hash

[ my_subject_alt_names ]
DNS.1 = *.logsine.com
DNS.2 = logsine.com
  • You create a CSR using this config using:
    openssl req -verbose -new -sha256 -days 1825 -key certs/entity.key -out certs/entity.csr -config certs/entity.conf

If you accidentally sign a certificate, for a given/particular common name, that isn’t set up how you want it, then you will have to revoke the incorrect/old certificate before OpenSSL will let you sign a new one for the same common name. Revoking a certificate issued by your CA is very easy – just use the same CA configuration file and the -revoke option:

openssl ca -verbose -config conf/openssl.ca.conf -revoke certs/entity.crt
  • Getting anything else to recognize revoked certificates involves certificate revocation lists (CSLs).

Are you willing to try a third-party tool if it might be easier?

Postface

● The bit-length of a private key defines how many possible combinations it could be, and thus determines the difficulty of “breaking” its security by trying to guess it. However, making it longer also increases the amount of processing time it takes to create, transfer, etc. Also, many applications may have limits on the length of SSL certificate accepted. For the tutorial below, I simply picked a longer bit-length than was recommended at the time I was learning about it but was also what I guessed was not too large to be accepted by modern applications.

● Although creating your own certificate authority is currently the only way to freely obtain a bunch of otherwise obscenely [extortionately?] expensive SSL certificates, Let’s Encrypt (sponsored by the likes of Mozilla and the Electronic Frontier Foundation (EFF)) may be a viable, free option in the future.

● SHA1 began to be phased out in September, 2014. SHA256 (a.k.a. SHA2) is its replacement. Although OpenSSL supports algorithms other than SHA256, I wouldn’t use them.

Learn More

  • Learn about OpenSSL configuration files.
  • Read up on and try using an Intermediate Certificate Authority certificate.
  • Learn about the authorityInfoAccess certificate extension and Online Certificate Status Protocol (OCSP).

References

Sources

Services, Tools, and Resources

Relevant Documentation

Troubleshooting

USB Ubuntu installation fails – BOOTMGR is missing

Trying to install Ubuntu Linux using a bootable USB [pen] drive will result in nothing but the message “BOOTMGR is missing” after selecting to boot from the USB drive if the drive is not formatted with the FAT32 filesystem. This is the case even if you use UNetbootin, which only copies files and does not format the drive. You should not stumble into this problem if you use Rufus, although using that may require changing the version of Syslinux that Rufus is using.

Services, Tools, and Resources

Sources

Pantheon Realms board game – alpha 1.1

Here is a print & play board game for you. Pantheon Realms (working title) is a board game where each of 3-6 players is an ancient god vying for the humans’ faith and to be the head of the first pantheon. Play goes through a number of eras of history and players use their powers (cards) to acquire the most followers (pawns/meeples).

Get it HERE (downloadable from public Google Drive).

It is fairly simple with only 3-4 pages of rules, most of which deal with edge cases.

It has 3 print & play options – simple (flat card pieces), papercraft, and 3D printable files (for a 3D printer).

If you download it, please let me know. Any feedback is appreciated! (logsinelabs at gmail)

Dynamic DNS For Home Serving With No-IP

Got a pcDuino3S running Linaro 12.07 [Linux] set up to run the No-IP dynamic DNS update client (DUC). These details should also work for a home server running Ubuntu or Lubuntu.

No-IP is a provider of Domain Name (DNS) services, and they have a free tier which you can use to dynamically map a domain name host to your home server’s external IP address.

Begin by registering a new No-IP account and signing up for the free service: https://www.noip.com/sign-up
Get the new account confirmation email and validate your email address/account.

Log in with your new account. Check that the hostname(s) you want are added: https://www.noip.com/members/dns/
Modify your host and set the IP address to one which is definitely not the external IP address to your home. This way you will know that the DUC is working because it will have updated your host’s IP address to be correct.

If you want to serve web content outside of your local network without using the default port 80, then you can modify an added domain to be a port 80 redirect instead of DNS Host (A) record. This means that when an external/remote computer/client tried to access your dynamic hostname on port 80 (i.e. the default port a web browser will try to use), then your server will receive that traffic on whichever port you specify (e.g. 8080) instead of on port 80.

Now you can follow the guide:
http://www.noip.com/support/knowledgebase/installing-the-linux-dynamic-update-client-on-ubuntu/
Why the /usr/local/src/ directory? See: What is the “/usr/local/src” folder meant for?

Running the configuration utility (which also happens automatically when you execute ‘make install’) will ask you for an Internet interface, your No-IP login information, the host(s) you want to update (unless you only have a single host registered to your account in which case that one is automatically selected for you), an update interval with a default of [30] (which I assume is denominated in minutes), and finally the option to specify a script/program to run after a successful IP update.

You can rerun the configuration utility if you need to:

/usr/local/bin/noip2 -C

* If you try to re-run the configuration utility while the No-IP DUC is running, then a warning will be issued containing the process identifier (PID).

Start the No-IP DUC running as a background task:

/usr/local/bin/noip2

Go to your information the No-IP website and check that host target has been correctly, successfully updated to be your external IP address.

Alternately, you can check the current IP your host resolves to using nslookup if you don’t want to visit the No-IP website.

nslookup www.noip.com

If you do not have nslookup currently available, get it with:

sudo apt-get install dnsutils

If you need to, you can find the No-IP DUC and stop its process:
Show All Running Processes in Linux

ps aux | grep noip

or if its name gets changed then try

ps aux | less

* ‘q’ gets you out of less.
Kill Process in Linux or Terminate a Process in UNIX / Linux Systems

kill #pid#

Optionally, you can create a simple bash script to log successful No-IP DUC updates.

nano ~/noiplogger.sh

with the one line of content:

echo $(date) " ===  successful No-IP update" >> /var/log/noipduc.log

Sources